
Showing posts with label Customizing Toolbars in vs 2013. Show all posts
Showing posts with label Customizing Toolbars in vs 2013. Show all posts
Tuesday, December 27, 2016
Creating Websites with Visual Studio
The preceding article Creating Websites with Visual Studio gave you a quick overview of creating a website in VS. You simply chose New Web Site from the File menu, selected a language, selected the standard ASP.NET Web Forms Site template, and clicked OK. However, there’s more to the New Web Site dialog box than you saw in the previous article. You may have noticed that you can choose among a number of different templates that enable you to create different kinds of sites. But before looking at the different templates on which you can base your new website, you need to know a little more about the different project types that are available in VS.
Different Project Types.
In Visual Studio 2013 you can choose between two types of projects for creating ASP.NET Web Forms websites: Web Application Projects and Web Site Projects.
Web Application Projects Web Application Projects make it easier for developers who work in teams or who need more control over the contents of the site and their compilation and deployment processes to build websites with VS. The whole website is managed as a project, with a single project file that keeps track of all the content of the website. In VS, you create a new Web Application Project through the File ➪ New Project dialog box. The Web category contains a single template — ASP.NET Web Application — that lets you create a web application that can contain various ASP.NET-related technologies such as Web Forms, ASP.NET MVC, and Web API. This is part of Microsoft’s “One ASP.NET” initiative that aims to bring the various web technologies closer together in Visual Studio. For more information about these technologies, visit www.asp.net and click the Learn menu item.
Note:
For more information on One ASP.NET, and to learn more advancedtechniques, consult Professional ASP.NET 4.5 (Wrox; ISBN: 978-1-118-31182-0).
Web Site Projects Web Site Projects represent a project in VS for a website. You create a new Web Site Project by choosing File ➪ New Web Site or File ➪ New ➪ Web Site from Visual Studio’s main menu.
A Web Site Project site is simply a Windows folder with a bunch of files and subfolders in it. There is no collective file (known as the project file with a .vbproj or .csproj extension) that keeps track of all the individual files in the website. You just point VS to a folder, and it instantly opens it as a website. This makes it very easy to create copies of the site, move them, and share them with others, because no dependencies exist with files on your local system. Because of the lack of a central project file, Web Site Projects are usually simply referred to as websites, which is the term I use in the remainder of this articles.
Note You can’t use a Web Site Project to create MVC or Web AP applications.
-------------------------------------------------------------------------------------
Choosing between Web Site Projects and Web Application Projects
Customizing Keyboard Shortcuts in vs
Another setting many developers like to change is keyboard shortcuts.and today we will Customizing Keyboard Shortcuts in vs Keyboard shortcuts are a great way to save time because they enable you to perform a task with a simple keyboard command instead of reaching for the mouse and selecting the appropriate item from the menu. To change the keyboard shortcuts, choose Tools ➪ Options, expand Environment, and click Keyboard.
Alternatively, press Ctrl+Q, type keyboard, and hit enter. Locate the command for which you want to change the shortcut in the list of commands. Because this list contains many items, you can
filter the list by typing a few letters from the command. For example, typing print in the Show Commands Containing field gives you a list of all print-related commands. Next, in the Press Shortcut Keys field, type a new shortcut and click Assign. Visual Studio enables you to enter a double shortcut key for a single command. For example, you can bind the command Close All Documents to the command Ctrl+K, Ctrl+O. To perform this command, you need to press
both key combinations in rapid succession. Although a double shortcut key may seem like overkill, it greatly increases the number of available shortcut keys.
Resetting Your Changes
Don’t worry if you feel that you have messed up Visual Studio by trying out the numerous customization options. You have many ways to restore Visual Studio to its previous state.
Resetting the Window Layout
The command Reset Window Layout, accessible from the Window menu, resets all windows to the position they were in when you first started Visual Studio. This command is useful if you misplaced too many windows and ended up with a cluttered IDE.
Resetting the Toolbox
If you removed an item from the Toolbox by mistake or even deleted an entire tab, you can reset the Toolbox to its original state by right-clicking the Toolbox and choosing Reset Toolbox. You need to think twice before you use this command because it also deletes all your custom code snippets.
Resetting All Settings
If you followed along with the previous Try It Out exercises, and then started experimenting with the customization possibilities, your IDE is now probably in one of two states: It either looks exactly the way you want it, or it looks like a complete mess. In the latter case, it’s good to know that it is easy to clean up the chaos. To completely revert all Visual Studio settings to the way they were right after installation, choose Tools ➪ Settings ➪ Import and Export Settings or Tools ➪ Import and Export Settings, depending on the version of VS you’re using. Then choose the Reset All Settings option and click Next. If you want, you can create a backup of the existing settings; otherwise, choose No, Just Reset Settings.
You get another screen that enables you to choose among a number of settings collections. Choose Expert Settings or Web Development because these options give you access to all the features you need to follow along with this articles. Finally, click Finish. This action causes all settings to be reset to their defaults, including the window layout, Toolbox and Toolbox customizations, shortcut keys, and everything you may have changed in the Visual Studio Options dialog box. So, use this command only when you’re really sure you want a fresh, new setup of Visual Studio.
With some basic knowledge about ASP.NET pages and Visual Studio, it’s time for some real action. In the next chapter, you see how to create ASP.NET websites and web pages in much more detail. You learn how to organize your site in a logical and structured way, how to add the many different types of files to your site and how to use them, and how to connect the pages in your site. However, before you proceed to the next chapter, there is one more important topic you need to look at: the sample application that comes with the next section.
The Sample Application in ASP.NET
Monday, December 26, 2016
downloading Visual Studio
In today post we will provide you how to downloading Visual Studio You can get the free Visual Studio Express 2013 for Web from the Microsoft site at www.microsoft.com/express/. On the Express homepage, follow the Downloads link until you reach the page that offers the downloads for the Express products, including VSEW. From this page, you can download VSEW as a Web Install, where you download only the installer, while the remaining files are downloaded during the installation process. Make sure you choose Visual Studio Express 2013 for Web from the page, and not one of the other free Express products or one of the older editions of Visual Studio. Don’t be fooled by the file size of the Web Install download, which is just a few megabytes. The file you download is just the installer that downloads the required files over the Internet. The total download depends on your current system and will be somewhere between 500MB and 1GB. If you want to try out the full version of Visual Studio 2013, which also contains the web components, you can sign up for a free trial on the Microsoft site at http://msdn.microsoft.com/ vstudio. You can choose to download an ISO image that you’ll need to burn on a DVD or choose to download the Web Installer. Finally, you can download VSEW with the Microsoft Web Platform Installer (WPI) application available for download at www.microsoft.com/web/platform and at www.asp.net/downloads/.Besides VSEW, this tool also gives you easy access to many other web development–related tools and programs. The WPI is an excellent tool to get a whole bunch of web development–related programs and tools in one fell swoop. I often use it to get up and running quickly on a clean development machine.
This Try It Out exercise guides you through installing VSEW on your computer. It assumes you’re using the web installer, although the process for installing the Express edition from a DVD is almost identical. The steps you need to perform to install the full versions of Visual Studio 2013 are similar as well, although the screens you’ll see will be somewhat different.
1. Start by browsing to www.microsoft.com/ express/ and follow the instructions to download VSEW 2013. You can install directly by choosing the Download and then the Install Now link or you can download an ISO file that you can burn on a DVD or mount on Windows as a virtual drive. Make sure you download Visual Studio Express 2013 for Web, and not one of the
other free Express editions or older versions. If this link is ever changed or no longer provides direct access to the VSEW download, search the web for “install Visual Studio Express 2013 for Web” and you’ll be taken to a download page where you can start the installation.
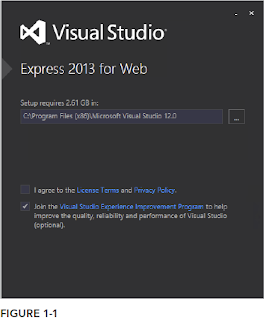
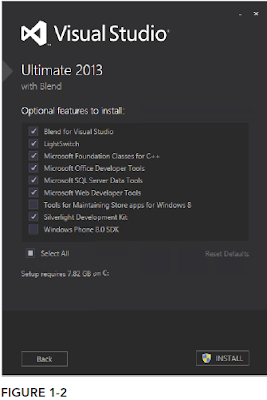
2. When the download completes, start the installer. You should see a screen similar to Figure 1-1. Check the checkbox for the license terms and privacy policy. If you’re installing the full version of Visual Studio, click the Next button that appeared when you agreed to the license terms. You see a screen similar to Figure 1-2. Make sure you select at least the Microsoft Web Developer Tools option.
3. In both cases, click the Install button to start the installation process.
4. After a while you should see a message indicating that Visual Studio has been installed successfully. The installer may need to reboot your machine during or after the installation. Once the installer has finished, Visual Studio is ready for use.
How It Works
The straightforward installation process guided you through the setup of Visual Studio. During installation, a copy of SQL Server 2012 Express Local DB, Microsoft’s free version of its SQL Server 2012 database engine, has been installed. SQL Server 2012 is discussed and used a lot in the future article. Now that Visual Studio is installed, it’s time to fire it up and start working with it. The next section shows you how to create your very first site in VSEW. You see how to create a site, add content to a web page, and view that page in your browser. downloading Visual Studio for which is very simple
Installing Visual Studio Express for Web (VSE W)
Installing VSEW is a straightforward, although somewhat lengthy, process. Depending on your installation method, your computer, and your Internet connection speed, installing VSEW may take anywhere between 20 minutes and an hour — or even more.This Try It Out exercise guides you through installing VSEW on your computer. It assumes you’re using the web installer, although the process for installing the Express edition from a DVD is almost identical. The steps you need to perform to install the full versions of Visual Studio 2013 are similar as well, although the screens you’ll see will be somewhat different.
1. Start by browsing to www.microsoft.com/ express/ and follow the instructions to download VSEW 2013. You can install directly by choosing the Download and then the Install Now link or you can download an ISO file that you can burn on a DVD or mount on Windows as a virtual drive. Make sure you download Visual Studio Express 2013 for Web, and not one of the

other free Express editions or older versions. If this link is ever changed or no longer provides direct access to the VSEW download, search the web for “install Visual Studio Express 2013 for Web” and you’ll be taken to a download page where you can start the installation.
2. When the download completes, start the installer. You should see a screen similar to Figure 1-1. Check the checkbox for the license terms and privacy policy. If you’re installing the full version of Visual Studio, click the Next button that appeared when you agreed to the license terms. You see a screen similar to Figure 1-2. Make sure you select at least the Microsoft Web Developer Tools option.

3. In both cases, click the Install button to start the installation process.
4. After a while you should see a message indicating that Visual Studio has been installed successfully. The installer may need to reboot your machine during or after the installation. Once the installer has finished, Visual Studio is ready for use.
How It Works
The straightforward installation process guided you through the setup of Visual Studio. During installation, a copy of SQL Server 2012 Express Local DB, Microsoft’s free version of its SQL Server 2012 database engine, has been installed. SQL Server 2012 is discussed and used a lot in the future article. Now that Visual Studio is installed, it’s time to fire it up and start working with it. The next section shows you how to create your very first site in VSEW. You see how to create a site, add content to a web page, and view that page in your browser. downloading Visual Studio for which is very simple
Subscribe to:
Posts (Atom)
Popular Posts
-
Selecting the rig ht units in 3ds max The Unit 3ds max setup dialog appears when you click Syst...
-
 An Introduction to ASP .NET 4.5.1 server ASP .NET 4.5.1 server is describe here When you type a URL like www.wrox.com in your we...
 -
Viewer panel in hitfilm The viewer panel in htfilm, is very helpful because Viewer panel give you access preview video se...
-
 The most important thing in 3ds max is how can Using the create and Modify Panel in 3ds max The Create ...
