Showing posts with label Customizing the Document Window in vs. Show all posts

Tuesday, December 27, 2016

Customizing the Document Window in vs


                 In today tutorial we will cover Customizing the Document Window in vs
  and the  Visual Studio gives you great flexibility with regard to how text is displayed in the Document Window. You can change things like font size, font color, and even the background color of the text. You can access the Font and Colors settings by choosing Tools ➪ Options, and then choosing Environment ➪ Fonts and Colors. Alternatively, press Ctrl+Q to put the focus on the Quick Launch textbox at the very top of the IDE. Then type font and press Enter to select the highlighted item Environment — Fonts and Colors. Quick Launch is a great tool for accessing features such as options and menu commands. For more information about Quick Launch, check out: http://bit .ly/1eljcko.

                        
  One thing I like to customize in the Document Window is the tab size, which controls the number of spaces that are inserted when indenting code. To change the tab size, choose Tools ➪ Options, and then under Text Editor choose All Languages ➪ Tabs. I usually set the Tab and Indent Size to 2 spaces, leaving the other settings in the Tab panel untouched. Another thing I like to customize is the number of line breaks before and after HTML elements. The Options window gives you full control over this: Select Text Editor ➪ HTML (Web Forms) ➪ Formatting and then click Tag Specific Options. In the list on the left you can select a tag and then with the settings on the right you can control how the tag is formatted. The Preview box makes it easy to see how the various settings change the formatting. Note that Web Forms has its own category in the Options dialog because it uses a different HTML editor under the hood than the other HTML-based editors found in Visual Studio.
    If you prefer to see line numbers in the gutter of the Document Window, choose Tools ➪ Options ➪ Text Editor ➪ All Languages and select the Line Numbers checkbox. With the exception of the Tab Size being set to 2 and the number of line breaks around a few HTML elements, all screen shots in this book show the default setup of VSEW.

tips time:
          It was developed by Microsoft to allow programmers to build dynamic web sites, web applications and web services. It was first released in January 2002 with version 1.0 of the .NET Framework, and is the successor to Microsoft's Active Server Pages (ASP) technology.

Customizing Toolbars in vs 20113

Monday, December 26, 2016

downloading Visual Studio

                            In today post we will provide you how to downloading Visual Studio You can get the free Visual Studio Express 2013 for Web from the Microsoft site at www.microsoft.com/express/. On the Express homepage, follow the Downloads link until you reach the page that offers the downloads for the Express products, including VSEW. From this page, you can download VSEW as a Web Install, where you download only the installer, while the remaining files are downloaded during the installation process. Make sure you choose Visual Studio Express 2013 for Web from the page, and not one of the other free Express products or one of the older editions of Visual Studio. Don’t be fooled by the file size of the Web Install download, which is just a few megabytes. The file you download is just the installer that downloads the required files over the Internet. The total download depends on your current system and will be somewhere between 500MB and 1GB. If you want to try out the full version of Visual Studio 2013, which also contains the web components, you can sign up for a free trial on the Microsoft site at http://msdn.microsoft.com/ vstudio. You can choose to download an ISO image that you’ll need to burn on a DVD or choose to download the Web Installer. Finally, you can download VSEW with the Microsoft Web Platform Installer (WPI) application available for download at www.microsoft.com/web/platform and at www.asp.net/downloads/.Besides VSEW, this tool also gives you easy access to many other web development–related tools and programs. The WPI is an excellent tool to get a whole bunch of web development–related programs and tools in one fell swoop. I often use it to get up and running quickly on a clean development machine.

Installing Visual Studio Express for Web (VSE W)

Installing VSEW is a straightforward, although somewhat lengthy, process. Depending on your installation method, your computer, and your Internet connection speed, installing VSEW may take anywhere between 20 minutes and an hour — or even more.
This Try It Out exercise guides you through installing VSEW on your computer. It assumes you’re using the web installer, although the process for installing the Express edition from a DVD is almost identical. The steps you need to perform to install the full versions of Visual Studio 2013 are similar as well, although the screens you’ll see will be somewhat different.
1. Start by browsing to www.microsoft.com/ express/ and follow the instructions to download VSEW 2013. You can install directly by choosing the Download and then the Install Now link or you can download an ISO file that you can burn on a DVD or mount on Windows as a virtual drive. Make sure you download Visual Studio Express 2013 for Web, and not one of the
downloading Visual Studio

other free Express editions or older versions. If this link is ever changed or no longer provides direct access to the VSEW download, search the web for “install Visual Studio Express 2013 for Web” and you’ll be taken to a download page where you can start the installation.

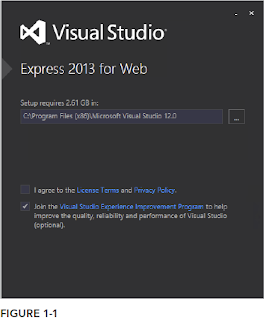
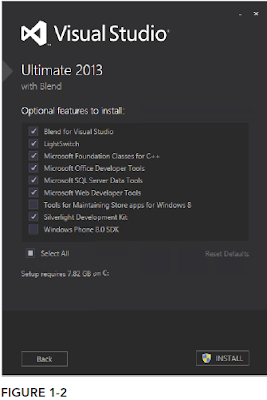
2. When the download completes, start the installer. You should see a screen similar to Figure 1-1. Check the checkbox for the license terms and privacy policy. If you’re installing the full version of Visual Studio, click the Next button that appeared when you agreed to the license terms. You see a screen similar to Figure 1-2. Make sure you select at least the Microsoft Web Developer Tools option.
downloading Visual Studio

3. In both cases, click the Install button to start the installation process.

4. After a while you should see a message indicating that Visual Studio has been installed successfully. The installer may need to reboot your machine during or after the installation. Once the installer has finished, Visual Studio is ready for use.

How It Works


The straightforward installation process guided you through the setup of Visual Studio. During installation, a copy of SQL Server 2012 Express Local DB, Microsoft’s free version of its SQL Server 2012 database engine, has been installed. SQL Server 2012 is discussed and used a lot in the future article. Now that Visual Studio is installed, it’s time to fire it up and start working with it. The next section shows you how to create your very first site in VSEW. You see how to create a site, add content to a web page, and view that page in your browser. downloading Visual Studio for which is very simple


Saturday, October 15, 2016

Creating First Program in ASP.NET

                                                    
               Today we will do our First program in asp.net using visual basic.net language visual stdio 1: The first step we should open Visual studio from start menu then from the IDE click on new website as shown in figure 2-2.  
Creating First Program in ASP.NET
figure 2-2

Today we will do our First program in asp.net using visual basic.net language visual stdio 1: The first step we should open Visual studio from start menu then from the IDE click on new website as shown in figure 2-2

Creating First Program in ASP.NET
FIGURE 2-3

2: The first thing we will select visual basic language and select the asp.net empty website and chose your save location on the browse button.

3: click on OK button
4: The new windows should open look like this as shown in figure 2-3


figure 2.4

5:Right Click On the website in the solution explorer click on add from menu and select new webfrom from there and give name your webfrom whatever you want and hit the add button


6:And new screen will appear look like this as shown in figure 2-4 bellow.


explanation:-
You probably can’t wait to get started with your first ASP.NET website, so instead of giving you a theoretical overview of websites in VS, the next Try It Out exercise dives right into the action and shows you how to build your first web project. Then, in the How It Works explanation and the section that follows, you get a good look at what goes on behind the scenes when you view an ASP .NET page in your browser.

1. Start Visual Studio from the Windows Start menu or Start screen. For VSEW, the menu item is called VS Express 2013 for Web. For Windows 8.1, you’ll need to click the down arrow on the Start screen to go to the list of all applications. If you’re using the commercial version of Visual Studio, just start Visual Studio 2013 from the Start screen; all web-related components are accessed from the main VS program. You’ll be greeted by a dialog that lets you sign in to Visual Studio with a Microsoft account. This is useful if you want to synchronize your settings across multiple machines. Click Sign In to enter your credentials or sign up for a new account. If you don’t want to sign in, click Not now, maybe later. The first time you start VS, there might be a delay before you can use it because it’s busy configuring itself. Subsequent starts of the application will go much faster.
2. If you’re using a commercial version of Visual Studio, you may also get a dialog box that lets you choose between different collections of settings the first time you start Visual Studio. The choice you make on that dialog box influences the layout of windows, toolboxes, menus, and shortcuts. Choose the Web Development settings because those settings are designed specifically for ASP .NET developers. You can always choose a different profile later by resetting your settings, as explained later in this chapter.
3. Once VS is fully configured, you see the main screen appear, as shown in Figure 1-3. You get a full description of all the windows, toolbars, panels, and menus in the next section, so
for now, just focus on creating a new website. Click the File menu in the upper-left corner and choose New Web Site.If you’re using a commercial version of Visual Studio, depending on the settings you chose when starting Visual Studio the first time, you may have to open the submenu New first. Make sure you don’t accidentally use the New Project menu, because that is used to create different types of .NET applications. 

The New Web Site dialog box appears as shown in Figure 1-4.


4. In the middle of the dialog, above the list of the available templates, select .NET Framework 4.5.1 from the drop-down list. Then, in the Installed Templates section on the left, you can choose a programming language you will use for your site. This book shows all examples in both Visual Basic and Visual C# so you can choose a language to your liking.

5. In the list of templates in the middle, click ASP.NET Web Forms Site. Verify that File System is the selected option in the Web Location drop-down list at the bottom left. If you want, you could change the location on disk where the website is stored by clicking the Browse button and choosing a new location on your computer’s hard drive. For now, the default location — a folder under your Documents folder — is fine, so you can leave the location as is.

6. Click OK. VS creates a new website for you that includes a number of files and folders (see Figure 1-5) to jump-start your website.

7. Open the file Default.aspx by double-clicking it and remove all the code inside the <asp:Content> block that has its ID set to BodyContent (it starts with <div> at line 5 and ends with </div>) all the way at the bottom. Replace it with the following
bolded code:
--------------------------------------------------------------------------------------------------------------------------
<asp:Content runat="server"ID="BodyContent" ContentPlaceHolderID="MainContent">
<h2>Hello World</h2>
<p>Welcome to Beginning ASP.NET 4.5.1 on <%: DateTime.Now.ToString() %></p>
</asp:Content>
--------------------------------------------------------------------
You’ll see code formatted like this a lot more in this book. When you are instructed to type in code formatted like this with some code in bold, you only need to type in the bolded code. The other code should already be present in the file. Don’t worry about the code with the angle brackets (<>) and percentage symbol in the welcome message; these are called tags, and you learn more about them later. Although this code may not look familiar to you now, you can probably guess what it does: It writes out today’s date and time.

8. Press Ctrl+F5 to open the page in your default web browser. You see a page similar to the one shown in Figure 1-6.


If you already have some experience with Visual Studio you may be used to pressing F5 instead. If you use that option, the site is opened in debug mode and you may get a dialog asking if you want to enable debugging (which you can safely do). Debugging with F5 is discussed in Chapter 18, and you’re advised to use Ctrl+F5 until then. If you see an information bar warning about intranet settings in Internet Explorer, click Turn on Intranet Settings. If you don’t see the date and time in the page, or if you get an error, look again at the code in the welcome message. It starts with an angle bracket (<) followed by a percentage symbol and a colon. It closes with a single percentage sign and another angle bracket (>). Also, make sure you typed in the code exactly as shown here, including capitalization. This is especially true when you are using C#, because that language is case sensitive.


9. Notice how a small icon representing IIS Express has appeared in the tray

bar of Windows, visible in Figure 1-7.


The icon belongs to the built-in web server called IIS Express. This web server has been started by VS automatically to serve the request for your page. You learn more about how the web server processes your page in the later section. If you don’t see the icon in the tray, click the arrow near the other icons in the Windows tray and click the Customize option. Then set IIS Express System Tray to Show Icon and Notifications. That’s it. You just created your very first ASP.NET website with Visual Studio.

How It Works

Although the website you created in this Try It Out is quite simple, the process that eventually results in the page Default.aspx being displayed in your browser isn’t so simple. All by itself, an ASP.NET page (also referred to as an ASPX page because of its extension, or a Web Form) can’t do much. It needs to be processed and served by a web server before your browser can display it. That’s why VS automatically started up IIS Express to handle the request for the page. Next, it started up your default web browser and directed it to the address of the web server (http://localhost:49815/Default in the Try It Out example), although the actual port number in the address may change every time you start the web server because it is randomly chosen by VS. It’s important to realize that the ASPX file you modified in VS is not the same as the one that eventually gets displayed by the browser.

When you create a page in VS, you add markup to it. The markup in an ASPX page is a combination of HTML, code for ASP.NET Server Controls (which you learn more about in this article and in and the future articles, code written in Visual Basic.NET or C#, and more. When you request an ASPX page in your browser, the web server processes the page, executes any server-side code it finds in the file, and effectively transforms the ASP.NET markup into plain HTML
that it then sends to the browser, where it is displayed. In the preceding Try It Out, the resulting HTML causes the browser to display the current date and time. HTML, or HyperText Markup Language, is the language that browsers use to display a web page. You learn how HTML looks and how to use it later article.

NEXT:  Workingwith ASP.NET Server Controls

Popular Posts

Contact Form

Name

Email *

Message *